rashbre central

Wednesday, 9 September 2015

more tsundoku with the tacx bracket

P9102282.jpg
More of that tsundoku feeling when I re-discovered this iPad rack.

It's for mounting on a bike. Not to be used on the road, but suitable for use with a turbo set-up. I acquired it sometime last year but at a time when the bike was better suited to going on roads rather than being placed on a turbo.

I'll get it working this year, probably with the Tacx and Trainerroad software although I doubt whether an iPad will allow simultaneous playing of a TV show and the use of the trainer metrics. First job is to find an iPad capable of working with the ANT+ protocol so I can link it to the Bushido.

Hmm. Bushido, tsunduko, ant+, tacx - it's like I'm talking in 積ん読 code.

Tuesday, 8 September 2015

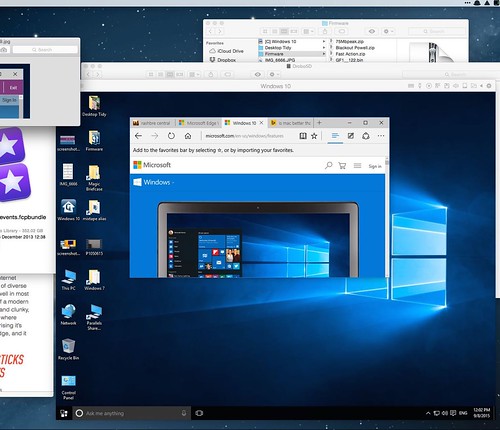
in which I try Windows 10 in iMac VM and it works fine

WIndows 10 inside OS/X
I've finally got around to installing a version of Windows 10 on my iMac in a virtual machine. After Windows 8 and 8.1, I decided to wait a while before attempting to swap across to Windows 10.

Actually my 'work PC' (and those of many colleagues) are still on Windows 7. I think it's indicative of the hopscotch that Microsoft has to play to try to find the right interface.

I've actually been pleasantly surprised with the transition to the Windows 10 experience. It's more like seeing the return of an old friend, maybe one that has been on a keep fit regime and returned super svelte.

Using Windows inside the iMac for productivity applications now seems to work properly. I've the updated version of Parallels as well and although there's various modes, I tend to keep Windows running inside its own box on the screen.

Booting a suspended Windows session takes maybe a couple of seconds and then runs at the same speed as the version of Windows 7 I still currently have on my Thinkpad. In other words, it doesn't get in the way and creates a perfectly usable experience.

I mentioned productivity applications because I'll usually only be using Windows with Office applications, plus related components such as MS Project and inevitably the MS browser, nowadays called Edge (i.e. no more Internet Explorer).

I've enabled Cortana too and just for fun asked whether Windows or Mac was best. MS may want to fix that response in the next update.

Another amusing aspect of the update has been reading some of the other reviews. My own history with Windows goes back to the early days, but clearly many reviewers of Windows 10 have a far more recent viewpoint, where some of the resurrected features are considered 'new'.

I guess that's the challenge now for suppliers into the consumer space. What else to do to make products look 'new' on an annual review cycle? Some didn't work so well, like the ancient Bob interface...

...although I know it was amusing for a while to add a desktop parody of it to Windows 8. And what about McZee...?

This week's new iPhone will be another case in point. Faster? Better camera? Thinner (or 0.2mm thicker)? More processor cores? More battery? Less bendy?

Not quite the game-changer snazziness that would have appeared with the earlier versions.

I guess the AVB (active virtual button) and sidewall display may still be another iteration away, based upon the Chinese usually correct pre-emptive clones.

Monday, 7 September 2015

gadget tsundoku

P9072275.jpg
I have one of those piles of unread books from the usual combination of purchases, gifts, recommendations and similar. The above illustration is just a few percentage of the problem.

I've another virtual pile of reading matter on my Kindle, where I've ordered things, planned to start them and then stalled.

The Japanese have a slang word for these book heaps. Tsundoku.

There needs to be another word for the other random piles of stuff that get saved for later. Most of ours seems to migrate into the garage, to eventually get triaged into:
  • Definitely useful
  • No hope
  • Possible use if adapted
My recent camera rig project has been mainly assembled from such bric-a-brac.

Although, come to think of it, next week we're getting another skip, in preparation for the re-build of the kitchen. And hopefully the kitchen won't be constructed from old parts stored in the garage.
P9072278.jpg

Completing the camera rig for the Lumix GH1 (DSLR camcorder build - Part 8)

P9072273.jpg
The re-chipped Lumix GH1 camera rig is pretty much complete.

I still need to add a black flexible donut ring (yep - that's how it is spelled). There's another term for it too, but I won't use that in this blog. Come to think of it they are also sometimes called bellows.

The donut/bellows is to block light between the lens and the start of the matte box.

My existing setup will work without it, but adding it will make things more free from flare. I estimate about £14 for that piece, which would just take me to the £100 mark for the entire camera.

Although this camera will already record stereo sound, I'll next be thinking about a better way to record separate sound, still on a budget.

Sunday, 6 September 2015

Adding follow focus to the Lumix GH1 (DSLR camcorder build - Part 7)

P9062254.jpg
I'm still figuring out the Lumix GH1 project. I've made a few small adjustments to the position of things on the home-made rig and just added the follow focus rack. This is one of those situations where photographic cameras and the movie camera business diverge, but a fairly simple change could make quite a difference.

Movie camera lenses are (a) expensive (b) manual (c) don't have many of the last 15 years of consumer advances incorporated, such as image stabilisation.

However, a major mechanical difference is that movie lenses have a gear built onto their focus ring. This allows a follow focus to be driven by an external wheel, and is the way that professional cameras (other than Electronic News Gathering) capture focus.

In order to implement this gearing on an SLR lens, there's a need to add a wrap around wheel with the gear teeth on it. In my opinion, it would be simple for manufacturers to build this into the original design of SLR lenses too, but I can understand why they don't.

A set of movie lenses consists of around 6 primes and for a modern set of Cooke would cost something like $60,000, or $10k per lens.

The lens above is a typical modern and brand new example, complete with a movie style bayonet mount. Notice the gears on the focus ring. Similarly, a set of Leica movie lenses will cost even more, perhaps $100,000. They also have the special gear teeth included.

I did check out the Canon set, which is a mere $30,000, although these use the Canon EF fitting instead of the standard movie one. Sure, these are fast lenses at f1.5, but maybe even these are outside of my budget.

That's where the plastic wrap around cogs and a zip tie come in.

My adaptation of a DSLR zoom lens cost about £6.

I know, it doesn't have the maximum aperture of the Canons or the Leicas, but it does fit straight onto my adapted m4/3 camera and work with the focus rack.

I'm nearly ready to try all of this in a few scenes, once I've put the matte box back on the front. The total cost so far is as follows:

So I'm up to spend of £86, so far. It would be good to finish the project for sub £100.
P9032244.jpg

Saturday, 5 September 2015

Plata o plomo en Narcos?


I'm watching "Narcos", the new series about drug dealer Pablo Escobar. I'm up to the part where he's moved from cigarette smuggling to trafficking industrial quantities of cocaine from Colombia to Miami.

It uses an American DEA agent to tell the tale with extensive voiceover to develop the story and provide recaps. I didn't mind this at the start, to get the plot up and running, but it gets more intrusive, along with freeze frames when the agent talks even more.

It's as if, because of frequent Spanish dialogue with subtitles, the producers thought that some help was needed to keep up. I wonder if there'll be a Spanish 'International' version of this series with all the subtitles reversed and the freeze frames removed?

Aside from that aspect, it's an interesting story of the initially small-time criminal who, in a few years, became a ruthless billionaire drug lord, operating his "silver or lead" approach (bribe or bullet) with anyone who got in his way.

He quickly had law enforcement, judiciary and media in his pocket, with any dissenters removed by his well-armed gang. The local area where he lived was bribed with street handouts of cash, extensive housing and other benefits, effectively building a wide zone within which he could live and operate with apparent impunity.

As a dramatisation of real events, it's difficult to know how much has been added, although key facts seem close to how it has been reported.

Escobar bought an island in the Bahamas to use as a stopping off point on his air route and upgraded from 'rented' light aircraft to lear jets and helicopters to ship the drugs. He famously had his own Piper aeroplane installed on the ranch-style entrance to his enormous Medellín home. That's the same plane that he used to personally pilot drugs along the smuggling route.

In a "can't make this up" twist, Escobar's old ranch is nowadays a theme park which still features a now safari-camouflaged plane over the entrance as well as a museum to the drug traffickers.

The series plays as drama rather than a documentary, albeit interspersed with actual footage of Escobar and others, typically during scenes from TV shows and news reports.

Where it struggles as a drama series is that there's no-one to feel sympathy towards.

The traffickers are all reprehensible hoodlums. The police and drug enforcers play fast and loose as well as receiving bribes and payoffs in all directions.

The dullard agent who gives the first person descriptions leadenly 'reads the lines' rather than creating any sort of personality. The appearance of his sidekick is immediately more interesting with perhaps only one fifth of the dialogue.

The dramatic gaps reinforce the sense that I'm watching an offbeat docudrama, yet I'm sure I'll see it through to Episode 10.

Friday, 4 September 2015

Adding a budget matte box to the Lumix GH1 (DSLR camcorder build - Part 6)

P9032252.jpg
Clipping the Lumix GH1 into the cage and adding the matte box only took a few minutes.

The no-brand matte box I've used is extremely basic, although I think it will do the job. I seem to remember that it came with many of the other smaller components which I now store in that orange accessory box.
P9032221.jpg
I don't want to get a replacement until I've checked whether everything else works and that could take some time.
P9032247.jpg
Short term, the matte box and the rest of the assembly is starting to look like a proper movie camera, even if the underlying camera is an adapted five year old device. The fun part is that the same setup will also work with my other video capable DSLRs, although it is useful to have one permanently set up for video.
P9032244.jpg
And cosmetically, looking at the picture, I think I'll need to swap out those blue plastic end-stoppers for the rails and start to think about how to add the follow focus.

Thursday, 3 September 2015

Caging the Lumix GH1 (DSLR camcorder build - Part 5)

P9032224.jpg
A few more pieces from the accessories box for the camera jigsaw puzzle.

There's a couple of rails and some pieces to build a quick release mechanism for both the camera into a cage and also for the cage onto a tripod. I'll be using the Arca Swiss system for this, which means I get the greatest interchangeability between my various cameras and tripods.
P9032225.jpg
First, I some 15mm rails and a 60mm spacer, which is the standard dimensions. Then I'll add an Arca Swiss style release to the cage, before adding this bracket and rails combination.
P9032227.jpg
The cutouts in the cage mean there is an access point for the quick release's control. Access to battery and similar parts of the camera isn't so important if the camera is easy to remove from the cage.
P9032228.jpg
Add the rails and also a further Arca plate to the underside of the cage and the main assembly is almost completed. I've used a long Arca plate and double mounting points to provide some ability to adjust the balance of the assembled unit depending on what it is carrying.
P9032232.jpg
I'll also add a top handle to the cage, fixed with two rather solid bolts. That gives a very secure frame for the camera and any accessories which are to be mounted with it.

So far (and as predicted) my only expenditure for this project has been on the square frame for the cage component, which I picked up from eBay.
P9032233.jpg
Now I'll look at all theses pieces together, temporarily mounted on a tripod, but without the camera. Of course, I'll want to use this with the Lumix GH1 that I've re-programmed, but I think it will also work with any of my other DSLRs.
P9032237.jpg
The whole thing will look more finished when there is a camera attached and a matte box on the front. Let's see what I can do with the super budget matte box from the spares box.

Wednesday, 2 September 2015

Dressing the Lumix GH1 to look more Hollywood (DSLR camcorder build - Part 4)

P9032221.jpg
I intend to use the box of bits and pieces I filmed yesterday to dress the Lumix GH1, to make it look more like a piece of video kit. Most of the parts come from a £25 kit that I bought on eBay a few years ago.

So far I've spent £0 new money on the adaptation. I've also found a few old Olympus Zuiko prime lenses, and have an adapter for m4/3 somewhere, so I guess I can count that as zero spend as well. Realistically I'd probably also use lenses from my micro 4/3 system.

Now to what's in the orange box of bits?
P9032207.jpg
At least there's some rails, which form an important part of the adaptation. The rails are part of the forward facing support structure.

One of my design points will be to use metal clips, rather than plastic, which will at least give some reassurance that the whole thing won't collapse. That's where some spend may start to creep in, although I've found a couple of clamps that are already metal.
P9032208.jpg
I'll also need a quick release system so that I can both remove the camera from the support and remove the support from a tripod. I've found one such clamp (below) but I don't think it will work if I also want to add on a metal cage structure.
P9032210.jpg
The cage is a simple metal frame to go around the camera. The idea is to have something load bearing that could take other peripherals such as microphones, and actually in the case of such a small camera to add some heft, which can be useful for stability.

I've had a quick look at some purpose built cages (which I'll have to buy) but have decided to get something generic rather than a cage built for the specific camera form factor. I'd prefer something larger and fairly square so that I could swap out this test camera if the whole thing actually works.
P9032212.jpg
I found the above bracket thing in the box, which could work until I can get a cage, but it looks so wrong to me, with its plastic bracket and lack of adjustments.
P9032219.jpg
In front of the lens there's a couple more things to consider. One is a focus puller. That's the kind of thing that real movie cameras use and is a big dial geared to rotate the camera lens from the front. I also found one of these in the box, but I think it will also need to be updated.

This basic one looks somewhat spartan, and I don't think would add to the credibility of the finished product. Along with a camera cage, they will probably be the 'ker-ching' moments.
P9032213.jpg
The other front of camera add-on is a matte box. That's the big square box with sunshields which screams 'Hollywood'. Okay, the orange box contained this - which maybe screams 'bad comedy routine', but I'm in two minds about how much it can be rescued.

The challenge is that 'real' matte boxes are pricey items, like this example called 'Viv', which weighs in at just over £1,100.

Georgeous, I'm sure, with its bright tangerine control knobs, carbon fibre flags and cassette-based rotating filters, but I'll probably settle for something that I can update with a spray can. At least the one in the orange box has metal French flags.
P9032220.jpg
Now, where's my screwdriver?

Tuesday, 1 September 2015

test footage from the re-blown firmware of the Lumix GH1 (DSLR camcorder build - Part 3)


Here's a first test of the modified camera.

I wanted to check that the autofocus could be used as well as manual focus. The key part of this test is check that the focus changes will create a suitably blurred depth of field, which is not what you get from many regular camcorders. It seems to be working.

Next I'll try some footage to a better SDHC card, so that I can crank up the speed of the output. I'd like to shift from the 17 Megabit/second peak of the standard GH1 to closer to 50Mb/s.

I have't manually adjusted exposure or ISO yet, but I want to know that I'm getting the right shutter speed for video (The 180 degree rule etc).

Then I'll be looking for some sort of focus puller mechanism to support manual focusing properly and a few bits and pieces so that I can build it into a rail and cage system. And an external microphone, I suppose.

The orange box in the video seems to contain some rudimentary components that might be useful.

I realise that this camera is already a few years old, but it's fascinating to quickly make it into something dedicated and still useful. And, if it works, the body is still updatable and the lenses and other bits will still work.

Monday, 31 August 2015

Changing the Lumix GH1 firmware (DSLR camcorder build - Part 2)

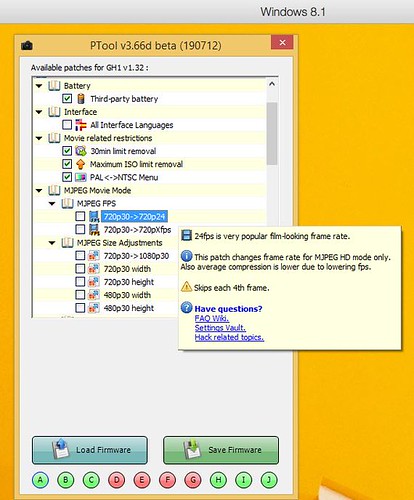
screenshot_1441 Ptool for Lumix GH1
To modify the Lumix GH1 firmware, I've downloaded the Ptool utility.

It's a Windows exe, so I've had to run it in a Parallels session on the iMac (I'd forgotten just how quickly Windows 8 Parallels boots as a session on my iMac).

The basic approach is to take the standard firmware image for the camera and the use Ptool to edit appropriate settings. There's a wide variety available (with handy hints) as well as some pre-defined sets contributed by other people.

I've defined my own set, which at this stage are fairly conservative. The (at your own risk) process steps are:

  1. Download Ptool to a PC.
  2. Download a copy of the latest Panasonic Firmware to the same PC.
  3. Use Ptool to modify the firmware image on the PC.
  4. Create a new firmware image, which must then be copied to an SDHC card in the root directory.
  5. Put the SDHC card into the Lumix GH1.
  6. Start the camera and then press the play button.
  7. Follow the prompts to update the firmware.
The update takes about a couple of minutes and then the new version is ready.

My next step is to try the change with some video recording...

refreshing an old Lumix GH1 for FHD video (DSLR camcorder build - Part 1)

P9010200 Lumix GH1 ready to be hacked
I've been using some video equipment recently as part of the Mixtape sessions and it got me thinking about ways to create a dedicated DSLR rig that could go alongside the Canon system that I normally use.

In practice, many DSLRs have video capabilities nowadays, and my routine use of Olympus OM-D EM cameras means that there is always a video capability available.

For this experiment, I want to make the camera dedicated for video, perhaps squeezing some more bit-rate from it than conventional. I guess it's a form of overclocking. The most well-known modifications are to Canon 5D II and III DSLR - mainly adding new menus for things like sound levels and exposure metering.

My preference was to do something with a micro 4/3 system. The cameras don't have lock up mirror to worry about and the type of sensor doesn't have the same heating issues as, say, a Canon.

I've selected an old Lumix GH1 body for the adaptation. The GH1 has plenty of form for being hacked, the most well known being via the work of Vitaliy Kiselev, who developed a firmware utility called Ptool which takes the Lumix firmware image and allows modification of various parameters.

That also explains why I'm using an old camera body for the experiment - this could all go horribly wrong. Actually, there's copies of the Lumix GH1 on eBay for around £100 now, whilst the similar form factor but progressively improved Panasonic Lumix GH2, GH3, and GH4 go up in price as £250, £400 and £900. I'm guessing the GH5 will appear early next year at around £1000.

The latest GH4 can record 4K video, but I'm happy enough to create something that will run with FHD (Full HD which is 1920x1080 pixels). It's still more pixels than many of the non-huge televisions use and won't look too out of place alongside my conventional HD camcorder images. To put it in context, a conventional 25 frame per second PAL DVD is 720 × 576 pixels per frame.

By using a micro 4/3 I can easily try a variety of lenses, including my old manual OM Zuikos. This could be quite entertaining and create a wide kit of parts for almost no outlay.

I'm also interested to create the finished object with more of a film camera appearance rather than looking like a stills camera, so I'll be looking for some cheap Meccano-like parts to be able to dress the finished item. It was amusing filming some of the Mixtape sessions and to get reactions about having a 'proper camera' when using the relatively modest Canon XF system. For this one I'm thinking matte box and camera cage.

But, first things first. I'll need to re-blow the firmware in the camera...